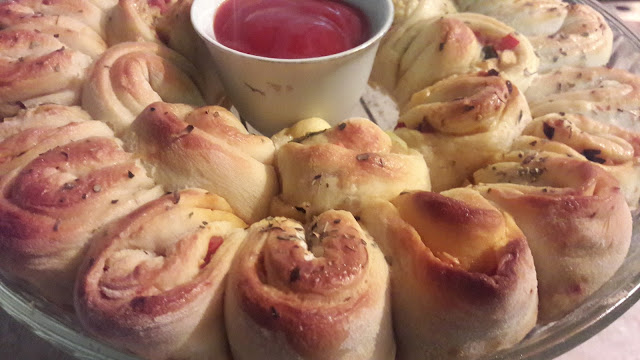
First attempt at
Pull apart Bread
I
am a big fan of cooking, baking, tossing and grilling – but kneading is something
I detest the most. Like theeee most!
I
have however always wanted to try out breads, different kinds of bread – the dough
is just like play dough – versatile and can be filled with whatever you like. I
wanted to try this particular pull apart bread, it looked pretty cool. A bit
too girly for my taste but pretty nonetheless.
I
just came across this pretty looking bread, with no ingredients, no
instructions – well they were there, lets say that I am not too well versed in
Russian, and before someone suggests – No, the page could not be translated. That’s
how I spent my weekend, hit and trial of this pull apart bread.
I
am pretty satisfied with how it turned out, considering this was my first
attempt. I think with a little bit more practice and tweaking it can
definitely be perfected.
Here
are the ingredients and instructions – In English.
Ingredients and
Instructions
In
a bowl take 1 tbsp of sugar, 1 tsp of salt, 2 tbsp of yeast and a cup of warm
water. Mix all and leave it aside till you see it become frothy.
In
an another bowl you need 2 cups of all purpose flour, 2 tbsp of Oil, 1 egg and
knead all this with the yeast mixture prepared above.
Knead
all nicely, smear a bit of oil once done and leave it covered for a couple of
hours – after 2 hours the dough will be twice its original size.
Roll
it out nice and thin and cut circles, make sure the area and your hands are
well floured so it doesn’t stick to your hands or the surface.
Spread
the filling, filling can be whatever you like. Mine was finely chopped
sausages, onion, jalapeno, olives – tossed for a minute over low heat mixed
with Tikka masala, the boxed one. Top it with cheese. Fold the circle once
horizontally and once vertically and arrange in a pre greased glass dish.
Once
you have the desired arrangement, take an egg, beat it well and give the dough
a nice egg wash. Sprinkle with a teaspoon of Oregano and into a preheated oven
for 30 minutes at 180 degrees.
Enjoy
hot!
Step
by Step pictures next time I try it out – promise!
Let
me know how it turns out.
Till
then,
Best,
Urooba.


No comments:
Post a Comment